Getting Started Tutorial
(See Also: Video version of this tutorial
and List of Available Tutorials)
| The following guide is intended to help new users of
Fund Manager get started tracking their investment portfolio.
For additional topics, see the
list of available tutorials. Before
starting, you should have already
downloaded and installed the program onto
your computer. If you haven't already
installed the program, visit our download page. After installation, you can
start Fund Manager by choosing "Start / All Programs / Fund
Manager / Fund Manager".
Fund Manager can track an unlimited number of
accounts. Each account you want to
track is normally set up as its own sub-portfolio.
Sub-portfolios can be hierarchical for additional
organization.
When creating new investments for your account you
can either record all the historical transactions, or
enter starting positions as of a specified date.
It is preferable to record all the historical
transactions, as this enables accurate performance
reporting over past time periods. In cases where
the historical data are unavailable or impractical to
enter, you may use starting positions. Historical
transactions can be retrieved automatically, imported
from a file, or entered manually. In order to
retrieve historical transactions or positions, your account must be
available from one of the
supported brokerage or mutual fund companies.
The term "retrieve" is used when Fund Manager connects
via the internet and automatically obtains your data.
The term "import" is used when you have your
data in a file, and Fund Manager reads in the data
from this file. Fund Manager can import
transactions and
positions from a
wide variety of files.
There are many ways to initially get your data into
Fund Manager:
(click on the
 next to the one you wish to read)
Retrieve Historical Transactions
and Positions
Import Historical Transactions
Manually Enter Historical Transactions
Retrieve Starting Positions
Import Starting Positions
Manually Enter Starting Positions
|
Retrieve Historical Transactions and Positions:
First,
close any sample data
that you may have open by selecting the menu command "File / Close
Portfolio". Next, open the New Portfolio
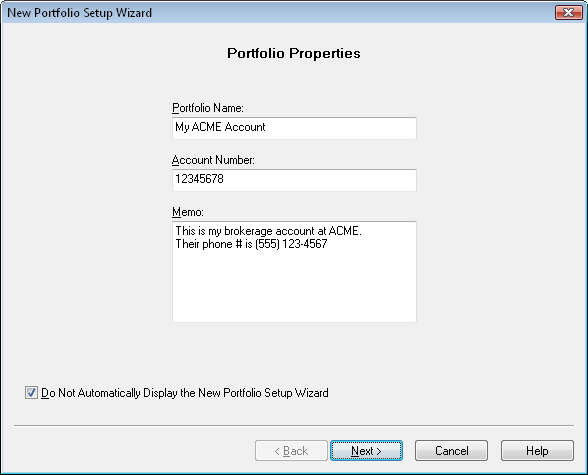
Wizard by selecting "File / New Portfolio Wizard..."
and fill in the information for your account:
Press "Next", choose your broker or fund company, and
enter your login information:

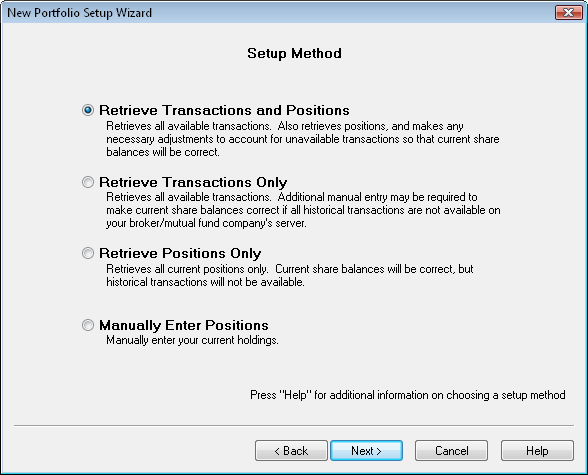
Press "Next" and choose the option to "Retrieve
Transactions and Positions":
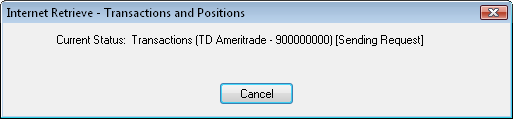
Press "Next" and your historical transactions and
current positions will be retrieved. You will see
the status displayed during the retrieve:
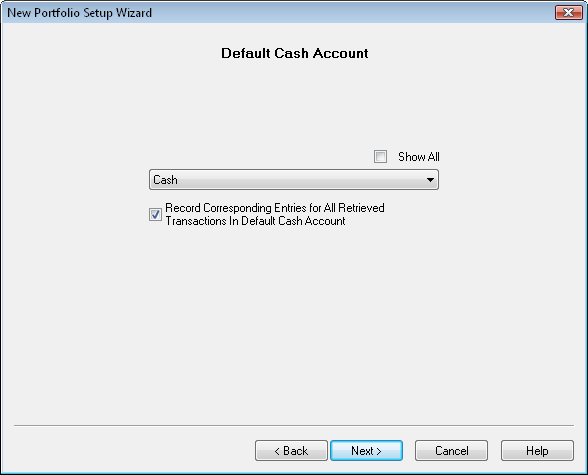
When the retrieve is complete you can choose which
investment should be your
default cash
account:
Press "Next" and review your retrieved positions:
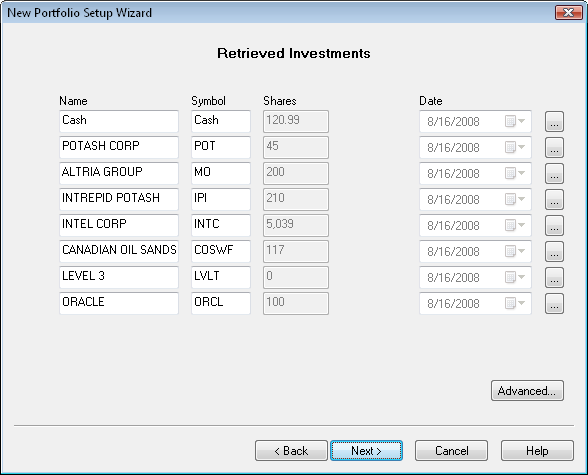
Press "Next" to update prices for your account:
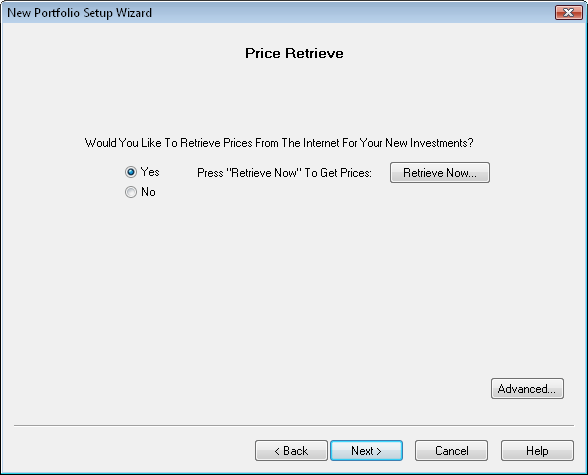
To retrieve historical pricing data for your
portfolio, press the "Retrieve Now..."
button:
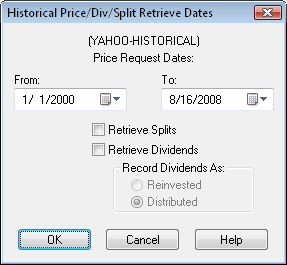
Retrieve pricing data for as far back as you need.
If you are using the Professional or Advisor versions
you will also see the options to retrieve
splits/dividends. Since we already retrieved this
data from the broker/mutual fund company leave these
options off here. Once price updating is done,
press "Next" and choose an option similar to below:
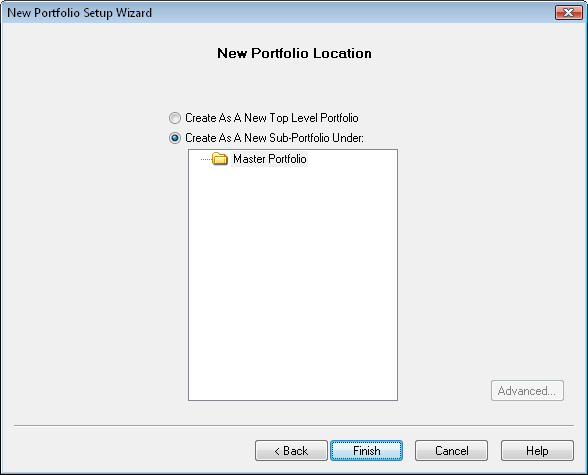
Press "Finish" to complete the setup. Your new
sub-portfolio will be displayed in the Portfolio Editor.
Next, we'll reconcile this account to verify all the
balances are correct. Right mouse click on your
new sub-portfolio in the Portfolio Editor, and choose
"Reconcile..." from the popup menu:

This will bring up the Reconciliation Wizard:
|
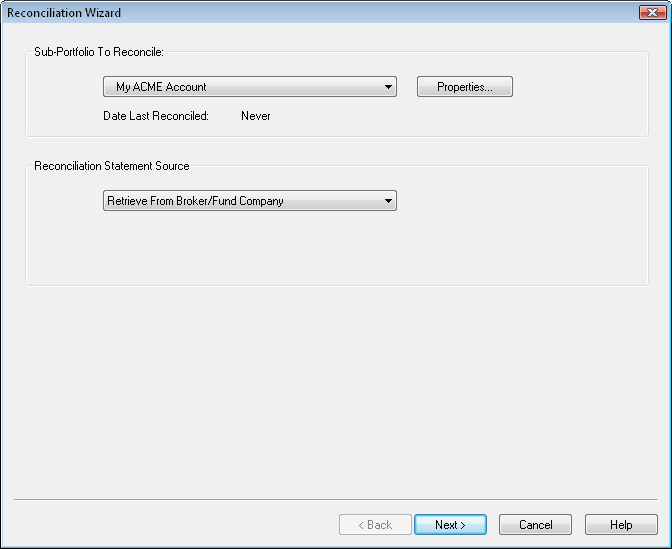
| Set the reconciliation source to "Retrieve from
Broker/Fund Company" and press "Next". Fund
Manager will retrieve a position statement from your
broker, and display the results of the reconciliation: |
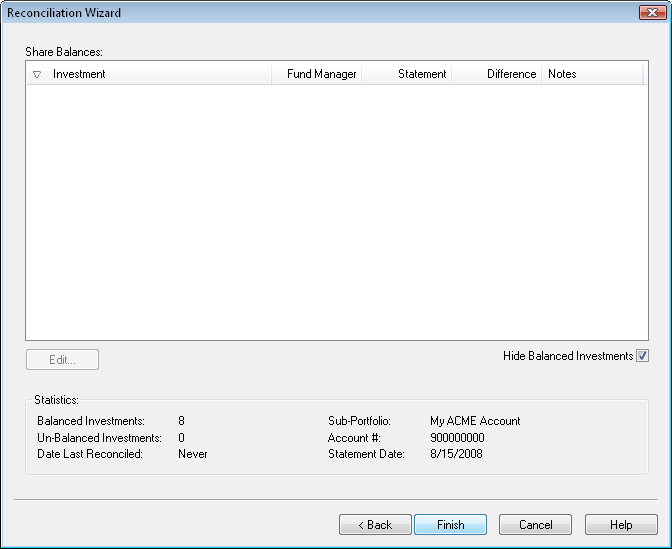
| Since we just retrieved transactions and positions,
everything should balance. If there were any investments that have an incorrect
share balance, select the investment in the list and use
the "Edit..." button to open up the
Data Register so you
can add/edit/delete any necessary transactions.
Press "Finish" to complete the reconciliation. If you
have some investments in your account that you no longer
own, you may want to hide
them. You can repeat the above process to set
up any additional accounts.
Now we
will save our data.
Background on Fund Manager Data Files:
There are 2 types of data files used by Fund
Manager:
- Investment files
- Portfolio files
Investment files have the file extension of *.dat.
Investment files store pricing, transaction, and the
properties for that investment. (more
info)
Portfolio files have the file extension of *.mm4.
Portfolio files store all of your sub-portfolios,
which investment files belong in each sub-portfolio,
which windows you have open, and all of your options.
Portfolio files can be thought of as saving your whole
workspace. When you re-open a portfolio file,
all of the included investments are also opened.
The windows you had open when you last saved the
portfolio file are also re-created, and all your
settings are restored to their values when you last
saved the portfolio file. In short, everything
is restored to the same state as when you last saved
the portfolio file. (more
info)
In many cases you will only need to have a single
portfolio file, but you will have many investment
files.
Choose the File / Save All Investments menu
command to save your investments. Choose File /
Save Portfolio As... to assign a portfolio filename
and save it.
The next time you start Fund
Manager, the last portfolio file you had open will automatically
be opened for you. Now exit Fund Manager by choosing File / Exit. Restart Fund Manager by choosing Start / All Programs / Fund
Manager / Fund Manager, and you will see your portfolio
again, just as you last left it.
Now that we've created some data let's examine our
investments with various reports and graphs:
Reports Tutorial
Graphs Tutorial
See Also:
|
Import Historical Transactions:
In this tutorial section we will go through the
following steps:
- Import
historical transactions
- Retrieve historical
pricing
1. Import Historical Transactions:
First, close any sample data
that you may have open by selecting the menu command "File / Close
Portfolio".
Before importing, you must obtain the file containing
your transaction history. This can be obtained in
a variety of ways, but some common ways include:
- Export from prior software, such as Quicken or
Money
- Download from your broker or mutual fund company's
web site
- Advisors can obtain a file from any of our
supported broker/dealer interfaces
For more details on any of the supported file import
formats see the
Importing Transactions topic in the documentation.
Once you have your transaction history file, select
the appropriate menu command from the "File / Import
/ Transactions" menu:
|
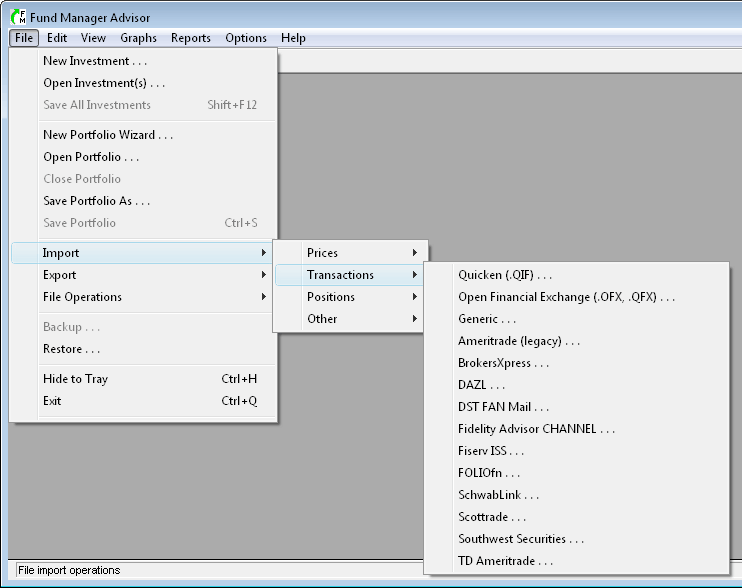
| For this tutorial we'll use the "Quicken (*.QIF)"
format. Once you select one of the above menu commands,
you'll see the appropriate transaction import dialog: |
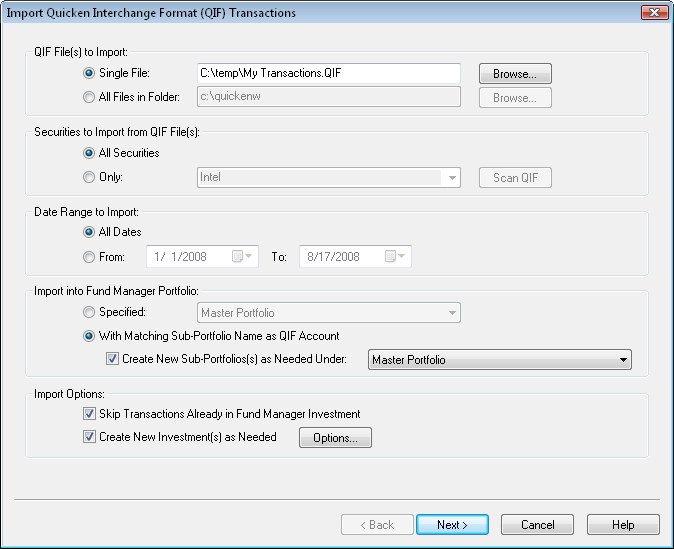
| In the first section of this dialog you can choose
to either import a single file, or all files in a
directory. If you choose "All Files In Folder", all
files in that folder with the .QIF extension will be
imported. In this example we're just importing a
single file (My Transactions.qif). In the second
section you can choose whether to import all available
securities, or only a specific one. We'll import
all securities.
In the third section you can choose to only import
transactions for a certain date range or all dates. We'll
import transactions for all dates.
In the "Import into Fund Manager Portfolio" section,
you specify the sub-portfolio where transactions will be
imported into. Select a specific sub-portfolio, or
have Fund Manager match the account from the importing
file with the sub-portfolio property. When this
"matching" option is selected you can choose the "Create
New Sub-Portfolios as Needed" option to have new
sub-portfolios created when a matching sub-portfolio
cannot be found. The method used to determine an
account / sub-portfolio match varies depending on the
type of data you are importing. Usually this is
based on account number. Since we don't have any
sub-portfolios created now, Fund Manager will create
them for us.
In the "Import Options" section you can choose to
have Fund Manager skip over transactions already in Fund
Manager. This is useful when re-importing a file
that may have already been imported. Matching
transactions are based on an exact match of date, price,
and shares. You also have the option of creating
new investments automatically. With this option
on, Fund Manager will automatically create any needed
new investments. Normally this option is left on.
Press "Next" to perform the import. The import
results will be available for previewing: |
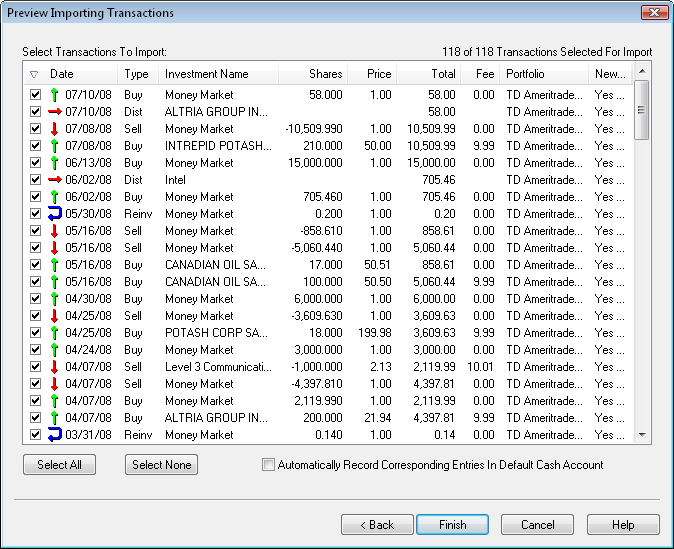
| The transactions you are about to import are listed. If
for any reason you don't want to import one or more
transactions, remove the check mark next to that
transaction. We'll leave them all selected for
this tutorial. When importing transactions there is an
option "Automatically Record Corresponding Entries In
Default Cash Account". When this option is turned on,
and a transaction is in a sub-portfolio with an assigned
default cash account, Fund Manager will automatically
debit/credit this cash account for any transaction that
generates or uses cash. If your importing data
already includes these cash account transactions, you
would want to turn this option off, so as to not double
enter these transactions. This sample data already
includes cash account transactions, so we will leave
this option un-checked. Whenever a new
sub-portfolio is created due to an import, you will be
prompted to assign a default cash account, as shown in
the next picture.
Press "Finish" to complete the import. For each
new sub-portfolio that is being created, you will
be prompted for how you would like to handle the default
cash account:
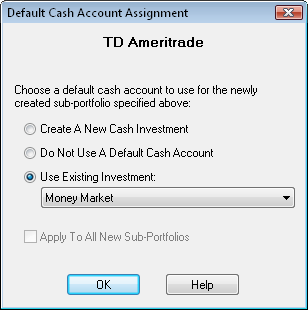
Each sub-portfolio can have its own default cash
account assigned to it. When a sub-portfolio has
an assigned default cash account, any transactions
recorded in that sub-portfolio will automatically have
corresponding entries recorded in the cash account.
For example, if you buy some shares of an investment,
the proceeds will come out of the default cash account.
For mutual fund accounts it is usually not necessary to
use a default cash account, but for brokerage accounts
you usually do want a default cash account.
If you choose the first option, "Create A New Cash
Investment", Fund Manager will create a new investment
and assign it as the default cash account for the
specified sub-portfolio. If you choose the second
option, "Do Not Use A Default Cash Account", no cash
account will be used for this sub-portfolio. If you choose the third
option, "Use Existing Investment", you can pick from any
of the existing investments in this sub-portfolio to be
the default cash account. You
can always modify the default cash account assignment at
any later time by selecting the "Properties..." of the
sub-portfolio.
Click OK after making your selection, and repeat for
each new account/sub-portfolio. You will then see
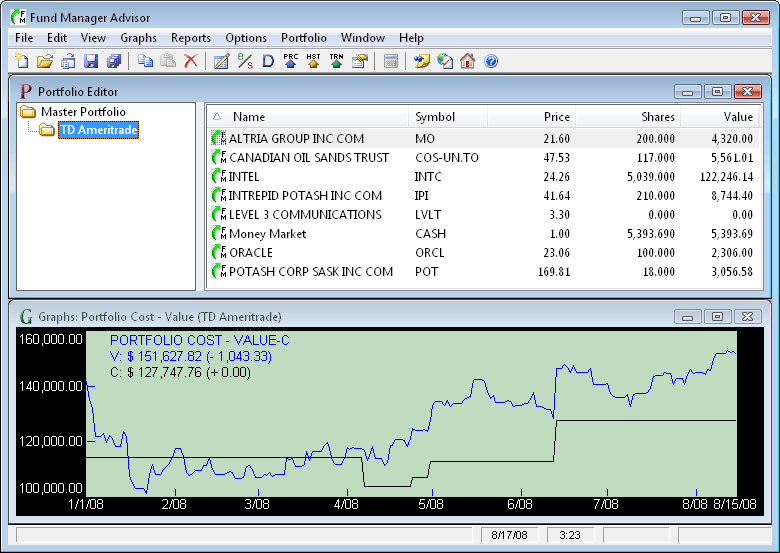
the main window look something like this:
|
|
2. Retrieve Historical
Pricing:
Some import file formats contain pricing data in
addition to transactions. For cases where you do
not get prices imported, we will now retrieve historical
pricing data. Even if your import did contain
pricing, it is okay to also retrieve prices. Fund Manager can retrieve prices
from a variety of quote servers.
In order to get historical prices we will select "Yahoo (Historical)"
for our historical quote server. Choose
"Options
/ Internet Settings..." from the menu and choose
this historical quote server as shown here:

Press OK. To retrieve historical pricing data for all open
investments select the menu command "Edit
/ Internet Retrieve / Historical Prices..." or choose the
 button on the
toolbar. button on the
toolbar.
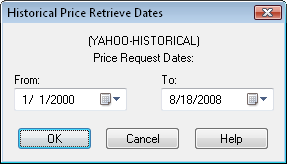
A dialog will come up asking you for a date range for
retrieving historical prices. Enter the date range
you would like, and select OK. You will see
Fund Manager connect to the quote server and retrieve
prices. You can view all the retrieved pricing
data in the Data
Register.
Once you have historical pricing, use the regular
server for obtaining daily quotes. It is best to use a
"daily" quote server instead of a historical one
for fast
retrieves. To retrieve using the regular server
select the menu command "Edit
/ Internet Retrieve / Prices..." or choose the
 button on the toolbar.
In this tutorial we used the "Edit
/ Internet Retrieve / Historical Prices..." menu command to retrieve prices for
all investments. You can also retrieve prices for
only select investments by selecting them in the
Portfolio Editor, right mouse clicking, and choosing "Retrieve Selected
Prices" or "Retrieve Selected
Historical
Prices".
Now we will save our data.
Background on Fund Manager Data Files:
There are 2 types of data files used by Fund
Manager:
- Investment files
- Portfolio files
Investment files have the file extension of *.dat.
Investment files store pricing, transaction, and the
properties for that investment. (more
info)
Portfolio files have the file extension of *.mm4.
Portfolio files store all of your sub-portfolios,
which investment files belong in each sub-portfolio,
which windows you have open, and all of your options.
Portfolio files can be thought of as saving your whole
workspace. When you re-open a portfolio file,
all of the included investments are also opened.
The windows you had open when you last saved the
portfolio file are also re-created, and all your
settings are restored to their values when you last
saved the portfolio file. In short, everything
is restored to the same state as when you last saved
the portfolio file. (more
info)
In many cases you will only need to have a single
portfolio file, but you will have many investment
files.
Choose the File / Save All Investments menu
command to save your investments. Choose File /
Save Portfolio As... to assign a portfolio filename
and save it.
The next time you start Fund
Manager, the last portfolio file you had open will automatically
be opened for you. Now exit Fund Manager by choosing File / Exit. Restart Fund Manager by choosing Start / All Programs / Fund
Manager / Fund Manager, and you will see your portfolio
again, just as you last left it.
Now that we've created some data let's examine our
investments with various reports and graphs:
Reports Tutorial
Graphs Tutorial
See Also:
|
Manually Enter Historical Transactions:
In this tutorial section we will go through the
following steps:
- Create a new
sub-portfolio using the Portfolio Editor
- Create a new
investment
- Create/assign a new
investment for the default cash account
- Manually enter
transaction history
- Retrieve historical pricing
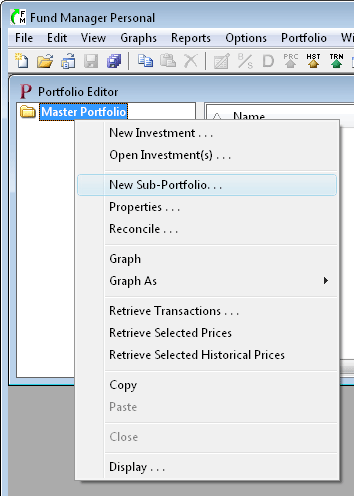
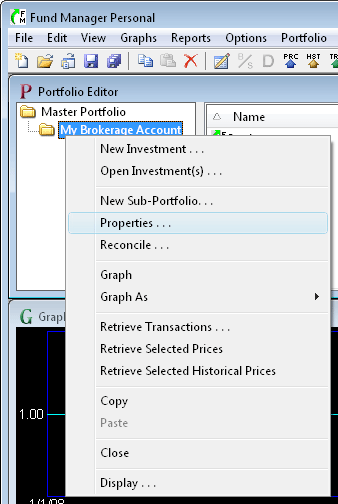
Create a New Sub-Portfolio Using the Portfolio Editor:
First,
close any data
that you may have open by selecting the menu command "File / Close
Portfolio". If the Portfolio Editor
window is not already displayed, open it with the menu
command "View / Portfolio Editor". Right
mouse click on the top level sub-portfolio (Master
Portfolio) and choose "New Sub-Portfolio" from the popup
menu as shown here:
Type in a name for the new sub-portfolio and any
other information you would like to remember for this
account. An
example is shown here:
Press "OK" to create the sub-portfolio.
Create a New
Investment:
To create a new investment in this sub-portfolio
select "File / New Investment..." from the menu.
Fill out the dialog with the details of this investment,
as shown here:
When creating a new investment you choose which
sub-portfolio to place the new investment in. In
this example we have placed it in our new sub-portfolio
"My Brokerage Account". You can also specify an
initial purchase in the "Opening Data" section. In
this example we will just start off with 0 shares, and
we'll record our purchases separately. Press "OK"
to create the investment. You will be prompted for
a filename to assign to this investment. Each
investment is stored as a *.dat file. Pricing and
transaction data for this investment will be stored in
this file. You can give the investment any
filename you want, and store it anywhere you want.
The default filename is based on the symbol, but you can
change it to anything you'd like. Assign the
investment a filename and save it.
Create/Assign a New
Investment for the Default Cash Account:
Now we'll create another investment that we will use
as our default cash account in this sub-portfolio.
Select "File / New Investment..." again and fill
out the dialog to look something like this:
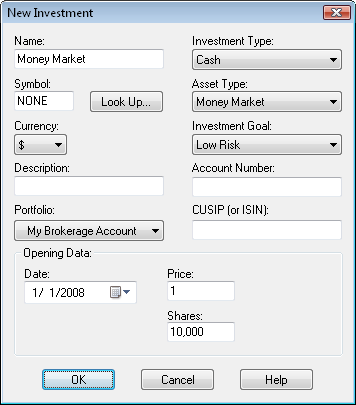
When creating cash accounts they are normally kept at
a constant share price of $1. In this example we
started the cash account off with a balance of $10,000
on 1/1/2008. Press "OK", assign a filename to this
investment, and save it.
To assign this cash investment as the default cash
account, right mouse click on the sub-portfolio in the
Portfolio Editor window and choose "Properties..." from
the popup menu:
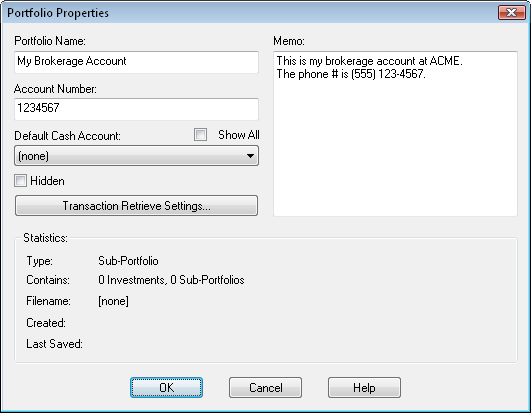
This will bring up the "Portfolio Properties" dialog,
where you can select the "Money Market" investment we
just created as the "Default Cash Account" for our
sub-portfolio:
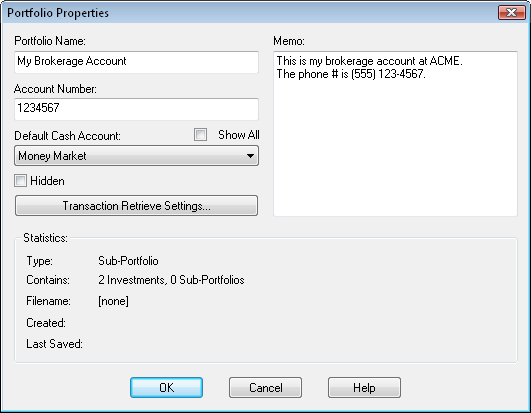
Choose OK to confirm the
changes, and now the "Money Market"
investment is assigned as the default cash account for
this sub-portfolio. From now
on, whenever you record a buy, sell, or
distribution in any investment in this sub-portfolio, the money will come out of, or go
into, this cash account.
An important point to note about
your cash account is that proceeds are only automatically
transferred to/from the cash account after you've
specified which investment is your default cash account. When
you are just starting out, you may want to create your cash
account first, and assign it as your default cash account, prior to entering
all of your other investments with their
transactions. This is not a requirement, but if
you'd like corresponding entries in your cash
account, then you would want to do this.
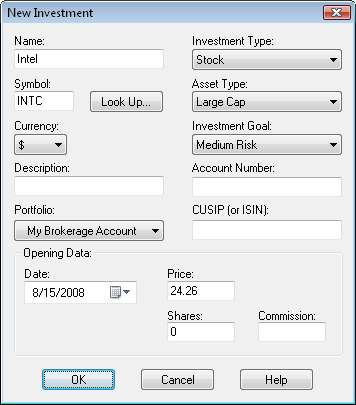
Manually Enter
Transaction History:
When we initially created the
"Intel" investment we started it off with 0 shares. Now,
we will go back and manually fill in the transaction history for
that investment. We will
manually enter the following transactions
for the "Intel" investment:
- Bought
1,000 shares on 5/9/2008 for $23.37
per share ($9 commission fee)
- Received a $290 dividend on 6/2/2008
- Sold
500 shares on 8/15/2008 for $24.26
per share ($9 commission fee)
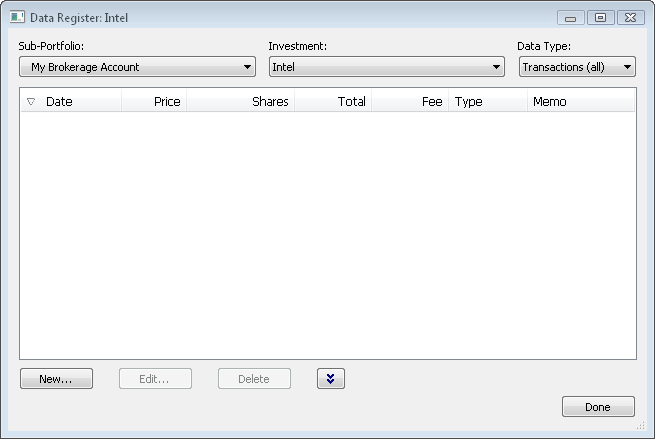
For
viewing/editing/adding transactions
you'll use the Data Register by choosing Edit / All Data...
from the menu or selecting the
 button on the toolbar. You can also access the Data
Register or record any transaction for an investment by
right mouse clicking on that investment, and choosing
the appropriate menu command. The Data Register
looks like this: button on the toolbar. You can also access the Data
Register or record any transaction for an investment by
right mouse clicking on that investment, and choosing
the appropriate menu command. The Data Register
looks like this:
|
|
To start
entering our transactions for Intel,
set the "Portfolio" combo box to "My Brokerage Account",
set the "Investment"
combo box to "Intel",
and set the "Data Type"
combo box to "Transactions (all)"
as shown above. You will notice under the "Data
Type" combo box there are 5
top level data types: Prices,
Transactions (all), Distributions
(all), Splits,
and Alerts. You can also
select one of the sub-categories, like
"Purchases",
which is a sub-set of "Transactions (all)". When you select
"Transactions (all)", all
purchases, reinvestments,
redemptions, and transfers are shown. The same concept
applies to "Distributions (all)"
and its sub-categories.
After making these selections, choose
the "New..."
button and enter the initial purchase
information as shown here:
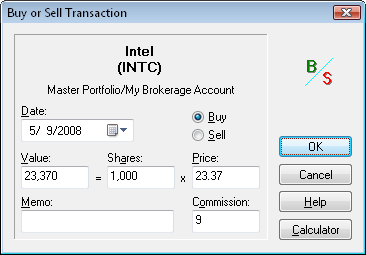
After
pressing the OK button you will see your
purchase listed in the Data Register. Next, to
enter the distribution, change
the "Data Type"
to "Distributions (all)"
and select the "New..."
button, and then fill in the dialog as
shown here:
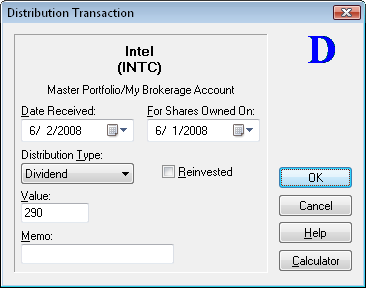
Once you
click the OK button you will see your
distribution added into the Data Register
again. Next, to record the sell transaction, select
the "Investments (all)"
data type (you could also choose the
"Redemptions"
sub-category data type), and then choose
the "New..."
button and fill in the dialog as shown here:
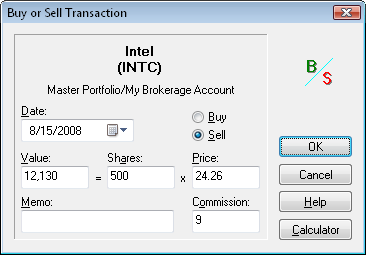
Choose OK and we've
completed entering the transactions for Intel.
Close the Data Register by pressing "Done".
Recording
Transactions Without Rounding Errors:
Often there can be small rounding errors
on your transaction summary statement, as
provided by your broker or fund company. Improperly
recorded, this can lead to small
differences between the share balances
reported by Fund Manager and your
statements. To prevent rounding errors,
record the Value and Shares
fields in Fund Manager as displayed on
your fund statement. Then, press the Tab
key to move the input focus to the Price
field. Fund Manager will automatically
adjust the Price field
to be consistent with the Value
and Shares. This method
records the Value and Shares
as displayed on your statement. If there
are rounding errors on your statement,
the Price recorded by
Fund Manager will be adjusted to the
correct price (consistent with the Value
and Shares). Fund
Manager always ensures that Value
= Shares * Price.
You can move the input focus around on a dialog
box by pressing the Tab key on your
keyboard. The order that the focus moves
around on a dialog box is referred to as
the "tab order". The
transaction dialogs in Fund Manager have
their tab order set to facilitate this
recording method. The tab order in
transaction dialogs moves from the Value,
to the Shares, and then
to the Price controls.
When recording transactions in investments that have
had splits occur, record the transaction data as it
occurred on the date of the transaction.
Retrieve Historical Pricing:
We will now update our investments with historical
pricing data.
Fund Manager can retrieve prices from a variety of quote servers.
In order to get historical prices we will select "Yahoo (Historical)"
for our historical quote server. Choose
"Options
/ Internet Settings..." from the menu and choose
this historical quote server as shown here:
Press OK. To retrieve historical pricing data for all open
investments select the menu command "Edit
/ Internet Retrieve / Historical Prices..." or choose the
button on the
toolbar.
A dialog will come up asking you for a date range for
retrieving historical prices. Enter the date range
you would like, and select OK. You will see
Fund Manager connect to the quote server and retrieve
prices. You can view all the retrieved pricing
data in the Data
Register.
Once you have historical pricing, use the regular
server for obtaining daily quotes. It is best to use a
"daily" quote server instead of a historical one
for fast
retrieves. To retrieve using the regular server
select the menu command "Edit
/ Internet Retrieve / Prices..." or choose the
button on the toolbar.
You may have noticed that pricing data for the Money
Market account was not retrieved. This is because
this investment was created as a "Cash" investment type,
and these have the investment property to retrieve
prices turned off by default. To see this, right
mouse click on the investment and choose "Properties..."
and select the "Internet Retrieve" tab. Normally
you would not want to retrieve prices for cash
investments as their price is kept at a constant $1.
Now we will save our data.
Background on Fund Manager Data Files:
There are 2 types of data files used by Fund
Manager:
- Investment files
- Portfolio files
Investment files have the file extension of *.dat.
Investment files store pricing, transaction, and the
properties for that investment. (more
info)
Portfolio files have the file extension of *.mm4.
Portfolio files store all of your sub-portfolios,
which investment files belong in each sub-portfolio,
which windows you have open, and all of your options.
Portfolio files can be thought of as saving your whole
workspace. When you re-open a portfolio file,
all of the included investments are also opened.
The windows you had open when you last saved the
portfolio file are also re-created, and all your
settings are restored to their values when you last
saved the portfolio file. In short, everything
is restored to the same state as when you last saved
the portfolio file. (more
info)
In many cases you will only need to have a single
portfolio file, but you will have many investment
files.
Choose the File / Save All Investments menu
command to save your investments. Choose File /
Save Portfolio As... to assign a portfolio filename
and save it.
The next time you start Fund
Manager, the last portfolio file you had open will automatically
be opened for you. Now exit Fund Manager by choosing File / Exit. Restart Fund Manager by choosing Start / All Programs / Fund
Manager / Fund Manager, and you will see your portfolio
again, just as you last left it.
Now that we've created some data let's examine our
investments with various reports and graphs:
Reports Tutorial
Graphs Tutorial
See Also:
|
Retrieve or Manually Enter Starting Positions:
To create a new sub-portfolio with starting positions we
will use the New Portfolio Setup Wizard. With the
New Portfolio Setup Wizard you can either retrieve or
manually enter starting positions.
First, close any data
that you may have open by selecting the menu command "File / Close
Portfolio". Select the menu command "File
/ New Portfolio Wizard..." to start
creating our new portfolio and investments. You
will be presented with the New Portfolio Wizard
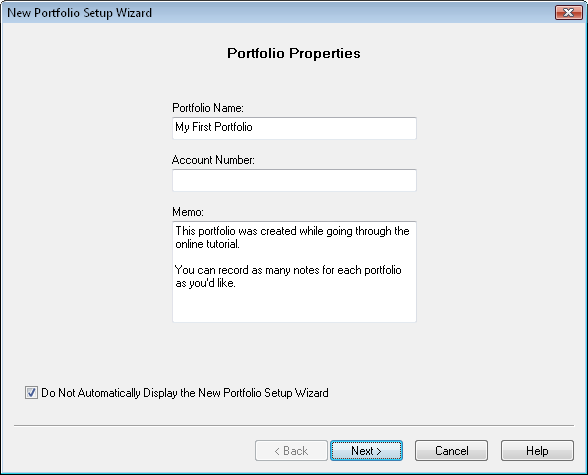
dialog. We will first assign properties for our new
portfolio. Fill in the fields of this dialog as
shown here:
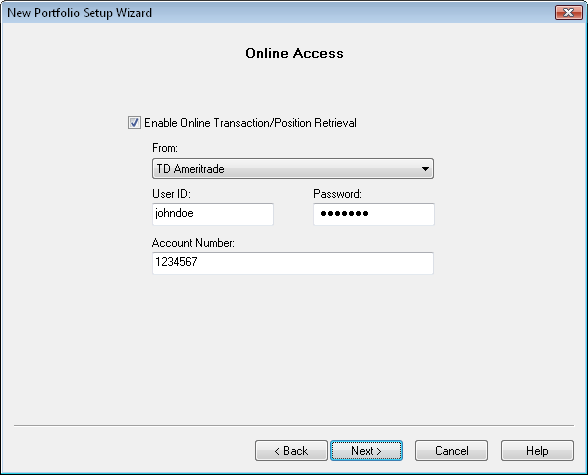
Press "Next" to enter online access details if this account is held at a broker or mutual fund
company that supports retrieving
positions:
Press "Next" to select a setup method. If
you have enabled online access you will have the option
to retrieve your information. You can also choose
to manually enter your current positions:

For this tutorial we will retrieve our starting
positions. You can also choose to manually enter
them. Press "Next" to have the positions
retrieved. Once the retrieve completes you will
see all your current positions:
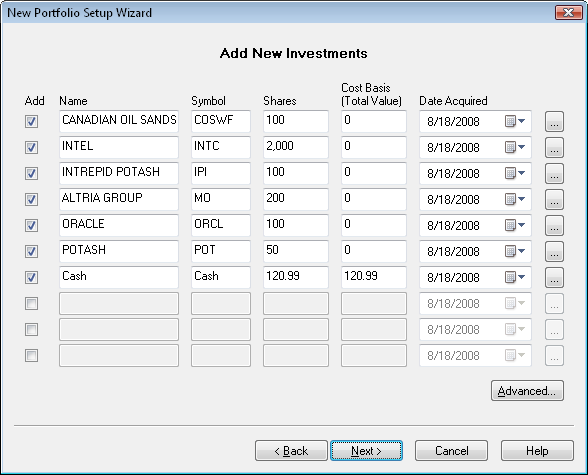
This dialog allows you to create new investments and establish their
starting positions. If you retrieved positions it
will be filled in for you. Retrieved positions
will not show a cost basis, but you can enter the basis
and date acquired here. Any of
this data can always be edited later, so
if you make a mistake, don't worry, you can correct it
later. To add an investment, select the "Add"
button for that row, and fill in the information.
If you want to start your investment with a certain
number of shares and cost basis, enter that information
here. (Notice the cost basis is a total dollar
value, not a per-share amount.) Fund Manager will record a single purchase
on the specified date for the cost basis. If you'd
prefer to enter your full transaction history to have a
more detailed record, just record 0 for the shares now,
and add in your transactions
later.
You can press the "..."
button at the end of each investment row to modify more
properties for each investment. For example, press
the "..." button to the right of the "Cash" and
set the "Type" on the "General" tab to "Cash" and on the
"Internet Retrieve" tab turn off the option to retrieve
pricing for this cash investment. Cash investments
should keep a constant $1 share price, so they don't
need to be set for price retrieval.
You can press the
"Advanced..." button to select a folder where your
investment files will be saved. For this tutorial,
we'll just accept the default location, so you don't
need to press the "Advanced..." button.
You can add as many
investments as you want. If you have more than
will fit on the current page, when you select "Next" you
will get another page to continue entering your
investments.
Press the "Next" button
once you're ready, and you will see the "Price Retrieve"
page of the wizard:
Here you can either have
Fund Manager retrieve prices for your new
investments, or if you select "No", you can manually
enter a price for each investment on the next screen.
For this tutorial we will retrieve historical prices
from the internet. You can use the "Advanced..."
button to select which quote server to use. The
default server when using the New Portfolio Wizard is
the Yahoo (Historical) server. We will just accept
all the defaults for this tutorial, so you don't need to
press the "Advanced..." button.
Press the "Retrieve
Now..." button, and you will be prompted for the date
range to retrieve:
Select a date range to
retrieve prices, and press the OK button. If you
have a slower internet connection, you may want to
choose a shorter time period than shown here. A
dialog box will show the status of the internet retrieve
as it is happening.
Once the retrieve is
complete press the "Next" button until you see the
"Default Cash Account" page:
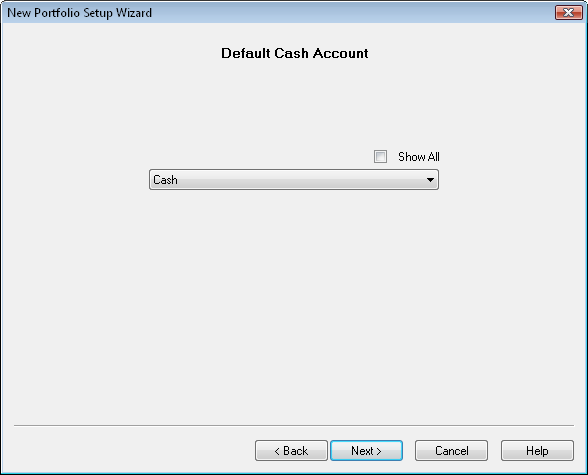
If you have a cash account in this
sub-portfolio select it from the list. Otherwise,
leave the selection set to "(none)". When a
sub-portfolio has a default cash account assigned
whenever you record a buy, sell, or distribution in an
investment in this sub-portfolio, the money will come
out of, or go into, this cash account.
An important point to note about
your cash account is that proceeds are only automatically
transferred to/from the cash account after you've
specified which investment is your default cash account.
If you decide later to change the default cash account you can
assign it under the "Properties..." dialog for any
sub-portfolio.
Press the "Next" button so that you see the "New Portfolio
Location" page:
Choose the option to create this new
sub-portfolio beneath the existing Master Portfolio, and
press the "Finish" button.
Now we will save our data.
Background on Fund Manager Data Files:
There are 2 types of data files used by Fund
Manager:
- Investment files
- Portfolio files
Investment files have the file extension of *.dat.
Investment files store pricing, transaction, and the
properties for that investment. (more
info)
Portfolio files have the file extension of *.mm4.
Portfolio files store all of your sub-portfolios,
which investment files belong in each sub-portfolio,
which windows you have open, and all of your options.
Portfolio files can be thought of as saving your whole
workspace. When you re-open a portfolio file,
all of the included investments are also opened.
The windows you had open when you last saved the
portfolio file are also re-created, and all your
settings are restored to their values when you last
saved the portfolio file. In short, everything
is restored to the same state as when you last saved
the portfolio file. (more
info)
In many cases you will only need to have a single
portfolio file, but you will have many investment
files.
Choose the File / Save All Investments menu
command to save your investments. Choose File /
Save Portfolio As... to assign a portfolio filename
and save it.
The next time you start Fund
Manager, the last portfolio file you had open will automatically
be opened for you. Now exit Fund Manager by choosing File / Exit. Restart Fund Manager by choosing Start / All Programs / Fund
Manager / Fund Manager, and you will see your portfolio
again, just as you last left it.
Now that we've created some data let's examine our
investments with various reports and graphs:
Reports Tutorial
Graphs Tutorial
See Also:
|
Import Starting Positions:
In this tutorial section we will go through the
following steps:
- Import starting positions
- Organize imported
accounts into client sub-portfolios
- Retrieve historical
pricing
1.
Import Starting Positions:
First,
close any sample data
that you may have open by selecting the menu command "File / Close
Portfolio".
Before importing, you must obtain the file containing
your starting positions. This can be obtained in
a variety of ways, but some common ways include:
- Export from prior investment software
- Download from your broker or mutual fund company's
web site
- Advisor's can obtain a file from any of our
supported broker/dealer interfaces
For more details on any of the supported file import
formats see the Importing
Positions topic in the documentation.
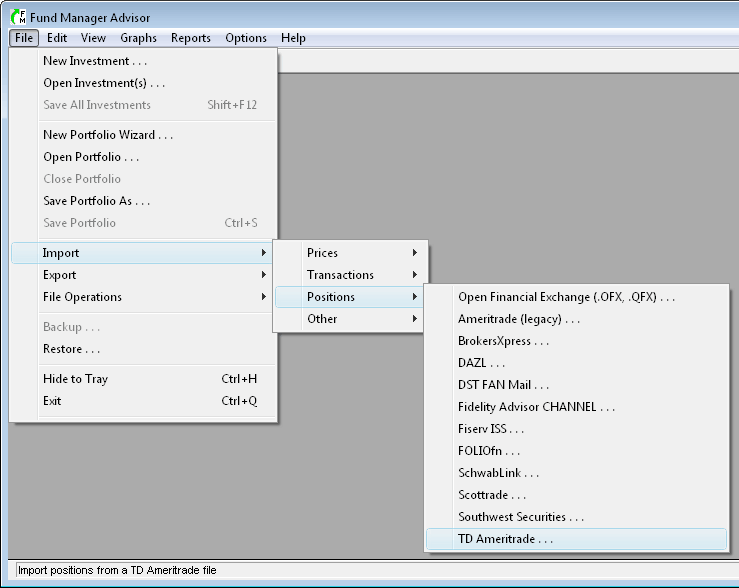
Once you have your position file, select
the appropriate menu command from the "File / Import
/ Positions" menu:
|
| For this tutorial we'll use the "TD Ameritrade"
format. This format is available to investment
advisors with accounts at TD Ameritrade. Once you select one of these menu commands
you'll see the appropriate transaction import dialog: |
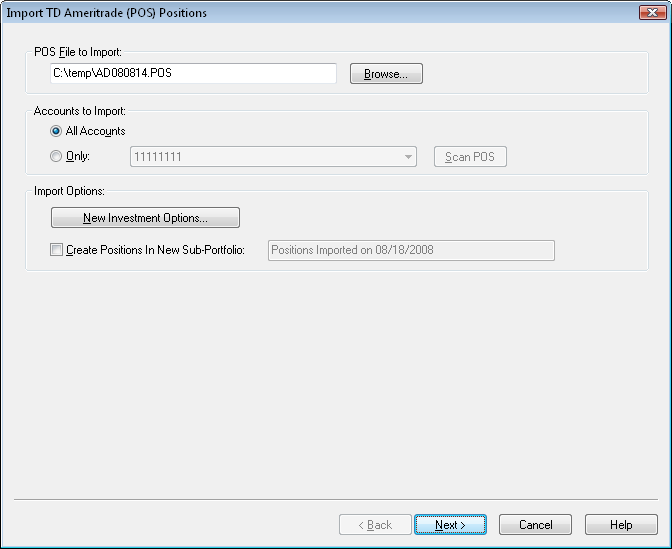
| Select the position file you wish to import in the
first section. In the second
section you can choose whether to import all available
accounts, or only a specific one. We'll import
all accounts.
In the "Import Options" section you can specify where
to save newly created investments, and whether or not to
put all imported positions into a new sub-portfolio.
We will leave this option off, to create new accounts
right at the top level of the sub-portfolio hierarchy.
Press "Next" to perform the import. The import
results will be available for previewing: |
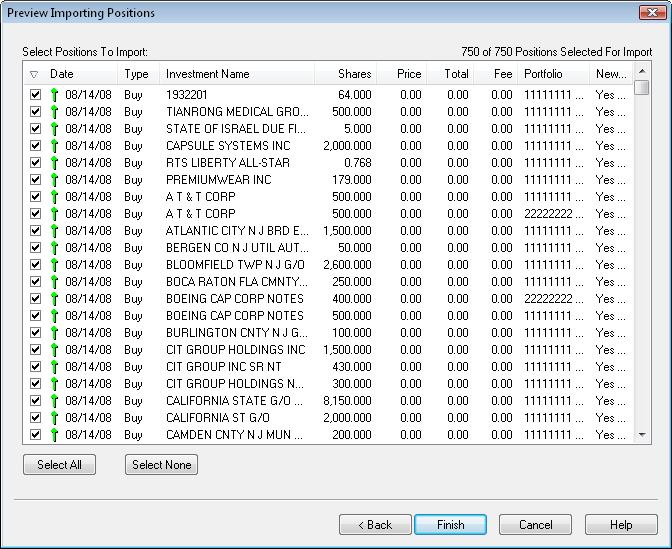
| All the positions from the importing file will be displayed. If
for any reason you don't want to import one or more
positions you can remove the check mark next to that
entry. We'll leave them all selected for
this tutorial. When positions are imported they are
recorded as "buy" transactions for the date specified in
the position file. Some position file formats
contain the cost basis for your positions, but some
formats do not. If cost basis data is not
available in the importing file, the basis will be $0.
If you have the cost basis data, you can manually edit
these buy transactions later to reflect the correct cost
basis.
Press "Finish" to complete the import. For each
new sub-portfolio that is being created, you will
be prompted for how you would like to handle the
default
cash account:
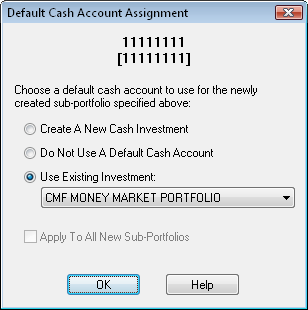
Each sub-portfolio can have its own default cash
account assigned to it. When a sub-portfolio has
an assigned default cash account, any transactions
recorded in that sub-portfolio will automatically have
corresponding entries recorded in the cash account.
For example, if you buy some shares of an investment,
the proceeds will come out of the default cash account.
For mutual fund accounts it is usually not necessary to
use a default cash account, but for brokerage accounts
you usually do want a default cash account.
If you choose the first option: "Create A New Cash
Investment" Fund Manager will create a new investment
and assign it as the default cash account for the
specified sub-portfolio. If you choose the second
option: "Do Not Use A Default Cash Account", no cash
account will be used for this sub-portfolio. If you choose the third
option: "Use Existing Investment" you can pick from any
of the existing investments in this sub-portfolio to be
the default cash account. You
can always modify the default cash account assignment at
any later time by selecting the "Properties..." of the
sub-portfolio.
Click OK after making your selection, and repeat for
each new account/sub-portfolio.
2. Organize
Imported Accounts Into Client Sub-Portfolios:
Next, we'll use the Portfolio Editor to organize our
imported accounts/sub-portfolios into another level of
hierarchy, organized by client. If the Portfolio
Editor isn't already open, select "View / Portfolio
Editor" to display it:
|
|
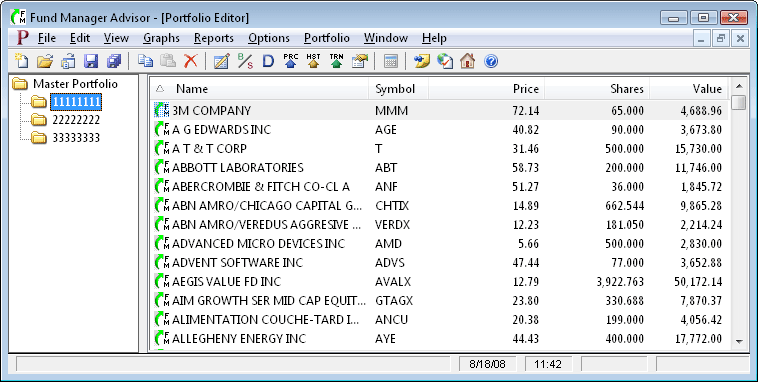
In the above picture the Portfolio Editor window is
"maximized", so it is displayed over the whole Fund
Manager window. You can minimize, restore, or
maximize this window by using any of the buttons in the
upper right corner of this window. You can also
use the commands under the "Window" menu to
organize or arrange all of your open windows. In
Fund Manager there are 3 types of windows: Portfolio
Editor, Graphs, and Reports. All open windows will
be listed under the "Window" menu.
The Portfolio Editor works a lot like Windows
Explorer does in Windows. You can create new
sub-portfolios, copy or move by dragging/dropping, and
copy/paste.
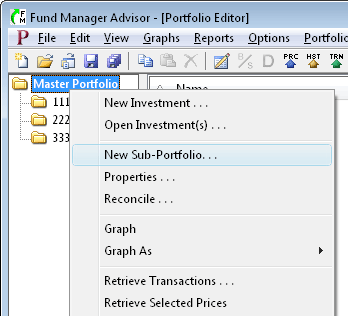
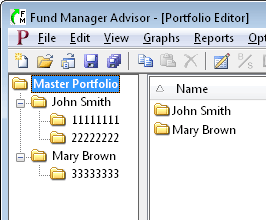
For this tutorial we will assume we have 2 clients:
John Smith, and Mary Brown. Accounts "11111111"
and "22222222" belong to John, and the account
"33333333" belongs to Mary. We must first create
sub-portfolios for John and Mary. Right mouse
click on "Master Portfolio" to create a new
sub-portfolio:
Fill out the "Portfolio Properties" dialog for John
Smith's sub-portfolio, like this:
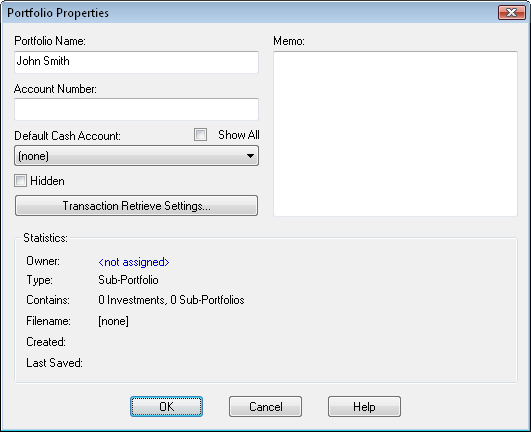
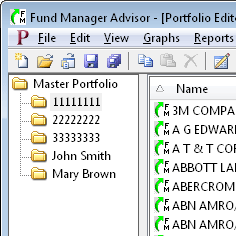
Press "OK" to create the sub-portfolio. Repeat
this for Mary by right mouse clicking on "Master
Portfolio" and filling out the "Portfolio Properties"
dialog again. The Portfolio Editor will now look
something like this:
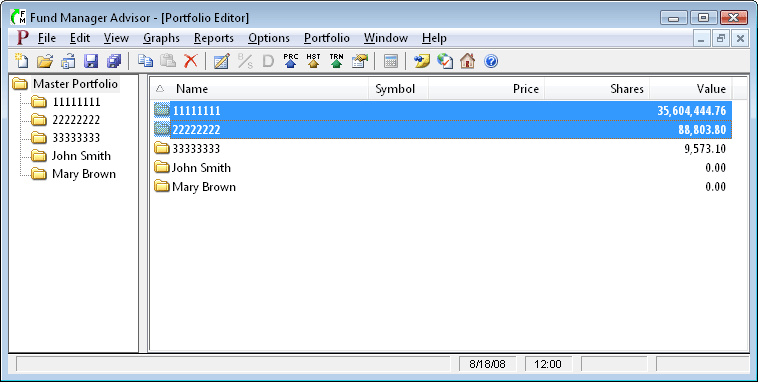
We now want to move accounts "11111111"
and "22222222" into John's sub-portfolio, and move
account "33333333" into Mary's sub-portfolio. Left
mouse click on "Master Portfolio" to select it on the
left. This will display the contents of the
"Master Portfolio" on the right. Select both
"11111111" and "22222222" on the right by left mouse
clicking on "11111111" and then hold down the "Ctrl" key
while selecting "22222222". You can use the "Ctrl"
key to select additional items, or the "Shift" key can
be used to select a range of items. When both
accounts are selected the Portfolio Editor will look
like this:
|
|
Left mouse click on the selected accounts, and while
holding down the left mouse button, drag the accounts
over onto the "John Smith" sub-portfolio:
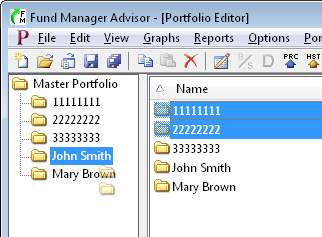
Once the cursor is over John's sub-portfolio, let go
of the left mouse button to complete the move of these
accounts. (In addition to "moving", you can also
"copy" sub-portfolios with drag/drop by holding down the
"Ctrl" key).
Repeat this for Mary: Select "Master Portfolio"
on the left, select "33333333" on the right, and drag it
over onto Mary's sub-portfolio on the left. Your
sub-portfolio hierarchy will now look like this:
You may also want to edit the sub-portfolio
properties of "Master Portfolio" to name it something
more meaningful to you, like "My RIA Practice Inc".
Organizing your sub-portfolios in this manner allows you
to report or graph at any level: account level, client
level, or your whole practice.
3. Retrieve Historical Pricing:
We will now update our investments with historical
pricing data. Fund Manager can retrieve prices
from a variety of quote servers.
In order to get historical prices we will select "Yahoo (Historical)"
for our historical quote server. Choose
"Options
/ Internet Settings..." from the menu and choose
this historical quote server as shown here:
Press OK. To retrieve historical pricing data for all open
investments select the menu command "Edit
/ Internet Retrieve / Historical Prices..." or choose the
button on the
toolbar.
A dialog will come up asking you for a date range for
retrieving historical prices. Enter the date range
you would like, and select OK. You will see
Fund Manager connect to the quote server and retrieve
prices. You can view all the retrieved pricing
data in the Data
Register.
Once you have historical pricing, use the regular
server for obtaining daily quotes. It is best to use a
"daily" quote server instead of a historical one
for fast
retrieves. To retrieve using the regular server
select the menu command "Edit
/ Internet Retrieve / Prices..." or choose the
button on the toolbar.
In this tutorial we used the "Edit
/ Internet Retrieve / Historical Prices..." menu command to retrieve prices for
all investments. You can also retrieve prices for
only select investments by selecting them in the
Portfolio Editor, right mouse clicking, and choosing "Retrieve Selected
Prices" or "Retrieve Selected
Historical
Prices".
Now we will save our data.
Background on Fund Manager Data Files:
There are 2 types of data files used by Fund
Manager:
- Investment files
- Portfolio files
Investment files have the file extension of *.dat.
Investment files store pricing, transaction, and the
properties for that investment. (more
info)
Portfolio files have the file extension of *.mm4.
Portfolio files store all of your sub-portfolios,
which investment files belong in each sub-portfolio,
which windows you have open, and all of your options.
Portfolio files can be thought of as saving your whole
workspace. When you re-open a portfolio file,
all of the included investments are also opened.
The windows you had open when you last saved the
portfolio file are also re-created, and all your
settings are restored to their values when you last
saved the portfolio file. In short, everything
is restored to the same state as when you last saved
the portfolio file. (more
info)
In many cases you will only need to have a single
portfolio file, but you will have many investment
files.
Choose the File / Save All Investments menu
command to save your investments. Choose File /
Save Portfolio As... to assign a portfolio filename
and save it.
The next time you start Fund
Manager, the last portfolio file you had open will automatically
be opened for you. Now exit Fund Manager by choosing File / Exit. Restart Fund Manager by choosing Start / All Programs / Fund
Manager / Fund Manager, and you will see your portfolio
again, just as you last left it.
Now that we've created some data let's examine our
investments with various reports and graphs:
Reports Tutorial
Graphs Tutorial
See Also:
|
|
|